Note: The features mentioned in this article are only available on Timed Entry events . Features mentioned below are not available on Regular events.
Unsure of the difference? Please see here: Regular events vs. Timed-entry events
If your event spans multiple days, weeks or months with more than one entry time per day (like an exhibit, class or tour) you can create a timed-entry event, which allows you to create and manage your event schedule and timeslots in one place.
If you would like to create a regular event, please follow our guide here.
To Create a Timed-Entry Event:
- Log-in or sign up to your Universe account. Select the Host Events button located at the top of your screen, then create an event, and follow the prompts.
-
On the following page, select the Timed-entry option, and click continue.
- Enter the basic information about your event:
- What is your event called?: Enter the name of your event. The field is limited to a maximum of 75 characters.
- Description: Describe your event and include any details you would like your attendees or customers to know and set expectations/restrictions. Use the toolbar above the Description field to customize formatting, add links, photos, videos, etc.
- Add a category: Select a category from the dropdown menu that best represents your event.
- Who can see your event: By default, your event is listed as Public and will be searchable through Universe's directory and search engines. If you would like your event to be private, you can set your event to Unlisted, which means that only people with the event URL can see your event page. If your event is unlisted, you can hide the social share button from your event.
- Address: Enter the address of your event. This will show on your event page and on your customer's tickets.
- Venue Name (optional): Enter the name of your event venue. This field is auto populated with the most relevant Google search result for your address.
-
Continue to Schedules. Click the + Add Timeslot(s) button to get started. This is where you will build your event schedule by adding groups of stand-alone, and/or recurring timeslots.
- In the pop-up window, follow the prompts to schedule your first timeslot(s):

- Date: Use the date picker to set your start date
- Start Time: Set the time the timeslot will begin. The timezone will default based on the address of your event.
- Duration: Set the length of the timeslot. Use the dropdown menu to determine whether the duration is in hours, or minutes. This selection will be the default setting for any additional timeslots that are created.
- + Add Another Time On The Same Day: Select this link to create an additional timeslot on the day selected. You may delete or modify individual timeslots after they are added.
-
Repetition Rules: Use the dropdown to assign repetition rules to the timeslots you've created. By default your timeslot(s) do not repeat. To create a schedule that extends over multiple days, repeat timeslot(s) every day, or on select days of the week. Recurring timeslots require a date of last occurrence.

6. Click the ‘add X timeslots’ button, in the bottom right corner, to save your changes, and return to the Schedule page. Repeat steps 4 and 5 to create additional timeslot(s) with different settings, as needed. You can see your total timeslot count under your list of schedules. No more than 2,000 total timeslots can be added to one event.
Note: You can delete individual timeslots from the calendar on the main Schedules page to create exceptions. To do so, select a date on the calendar and then click the trash icon beside the timeslot you would like to delete. Making exceptions does not reduce your 2,000 timeslots per event maximum.

-
Once your event schedule is complete, continue to 'Tickets' and use the 'Paid', 'Free', or 'Donation' buttons to determine the type of ticket you would like to set up.
- Enter the ticket details:

- Ticket name: Ensure your ticket types have unique names so you can easily differentiate one from the other at a glance.
- Quantity: The quantity you enter will be the number of these tickets available per timeslot.
-
Price: The number entered will be the price of a single ticket per timeslot.
(Optional) Clicking the gear icon reveals advanced ticket settings including description, availability (sales start and end time), minimum and/or maximum number of tickets per order, ticket status (available, hidden, or locked), and release time of tickets.
(Optional) Use the ‘This ticket is for’ dropdown to define time of day or day of the week rules that apply to this ticket type. To learn more about the different types of rules available read our guide here
Note: By default the price and quantity setting for a ticket will be consistent across all timeslots that the ticket is applied to. You can customize these fields and hide ticket types from showing to fans on a particular timeslot from the Timeslots tab in the Event Manager. Learn more.

- Click save to return to the Tickets page. Repeat steps 7-9 to create as many ticket types as needed.
-
Set a total timeslot capacity for your event (optional). The timeslot capacity will indicate how many people can register for each timeslot before it becomes sold out. The capacity will default to the sum of the maximum quantities for each ticket type. Customize the timeslot capacity to limit the total number of tickets available across all ticket types, or leave blank if you are not restricting attendance.
For example, if your venue has a fire code that requires no more than 200 people in the venue at one time you should set your timeslot capacity to no more than 200.
Note: It’s important to consider any rules that you’ve applied to your ticket types (e.g. weekday vs. weekend, morning vs. afternoon, day of the week, etc.) as only the ticket types that apply to a particular timeslot should be considered in the combined ticket type quantities.
- Set your currency and refund preferences:

- Buyer pays in: This is the currency that will be displayed to buyers (how the ticket price is shown). The default selection is based on the location of the event.
- Receive funds in: This is the transaction currency (how buyers' will be charged and how you will be paid out on your event). The default selection is based on the location of the event.
- Payment Processor: By default, payment processing is powered by Universe Payments. Event funds are added to your Universe account balance and can be withdrawn 48 hours after the end of the event. For rolling payouts, we support Stripe Connect. You have the option to switch to Stripe in Event Manager before tickets are sold, or to set Stripe Connect as your account default processor from your settings page (learn more).
-
Refund Policy: Set a refund policy for your event. This will show at checkout, order confirmation emails and on the customer's My Tickets page. If your refund policy is changed after tickets have been sold, the new policy will apply to future orders only (learn more).

- Continue to Additional Details:
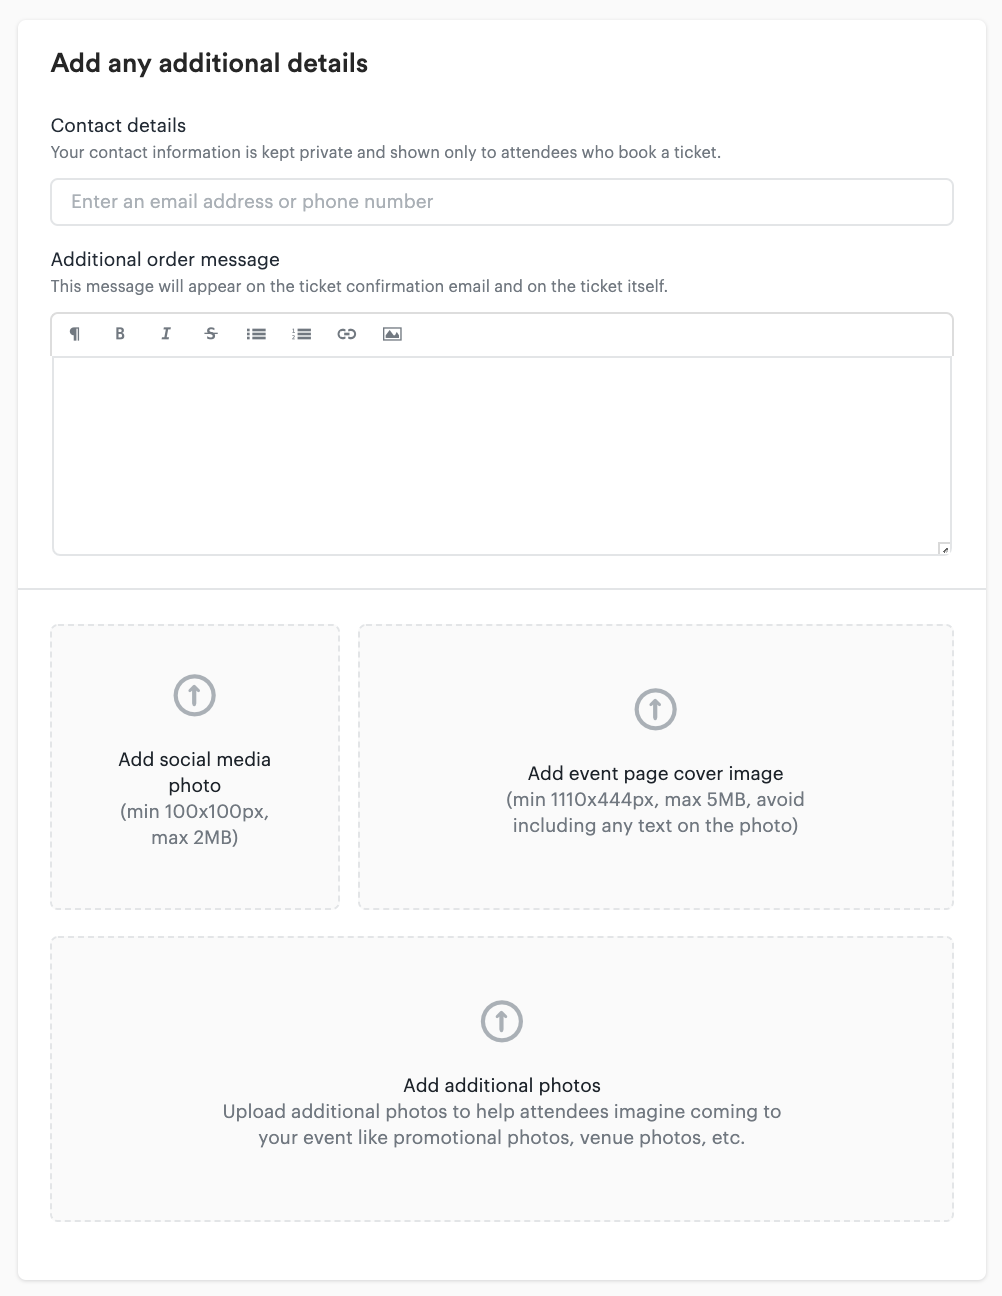
- Contact details (optional): Enter additional contact information to make it easy for attendees to reach you. This information will appear in the order confirmation email only and is never displayed publicly on your event page.
- Additional order message (optional): Write a note that will only show to confirmed buyers. This note will be displayed in the buyer's confirmation email and on their ticket PDF. This note is never displayed publicly on your event page.
-
Photos (optional): Uploaded photos will appear on your event display page. If left blank, a stock photo will be assigned to your event which can be edited at any time from the Event Manager. For a full guide on photos, click here.
- Complete the event creation process by selecting one of three options:
- Publish event: Makes your event live and allows buyers to start booking tickets.
- Schedule: Prompts you for a date and time to publish your event in the future.
-
Save as draft: Creates your event but does not make it live.

Note: Only seeing the Save as draft option? You must verify the email address linked to your Universe account before you are able to publish your event. Check your email inbox for a message from hello@universe.com with the subject line "Events await! Please confirm your account.," and click the confirmation button in the email body.
-
Congratulations, you're ready to go! If your event has a large number of timeslots our system may take a few moments to complete the build. Once complete, your event will be accessible from the My Events tab in your account.

Manage & Promote Your Event:
Once your event page is created, you'll be redirected to the Event Manager to access additional settings that allow you to easily manage and promote your event. For a full overview of the Event Manager, read our guide here.
Additional guides can be found in the Managing your Event section of our Help Centre.
Scan & Sell Tickets Onsite:
You can download BoxOffice, our free at-the-door app to scan tickets, check-in attendees, and sell tickets at the door. For a full overview, read our BoxOffice iOS or Android guide. Alternatively, you can download and print your event guest list to manage check-ins.